V9.2
Overview
Configuring search for Hot Operations solutions involves the following steps:
| Steps | Location | Performed by | Documentation | |
|---|---|---|---|---|
| 1 | Define searchable fields | JSON file |
| Configuring Elasticsearch Service |
| 2 | Enable change tracking | Cora SeQuence database |
| |
| 3 | Create connection string | Administration site |
| Current article |
| 4 | Set up indexing jobs | Administration site | ||
| 5 | Enable search in Flowtime | PowerShell function | ||
| 6 | Select a search provider | Administration site |
This article covers the procedures performed by the developer, tech lead, or architect (steps 3-6).
To learn how to perform the first steps, see the V9.2 tab in this article.
NOTE
This article is relevant only for Cora SeQuence V9.2. With V9.3, you can enable search for any workflow. As a result, some configuration procedures have changed.
Create the connection string
Configure the connection to the Elasticsearch service. You can create new connections, edit existing ones, or delete them.
Prerequisites
Before you create the connection string, make sure that:
- The Elasticsearch cluster is setup.
- You have the Elasticsearch connection details, such as:
- Connection type
- End Points
- Required credentials
- You have the relevant JSON file relevant file.
Procedure
- Go to Administration > Global Settings > Elastic Search Connections, and click Add New Record.
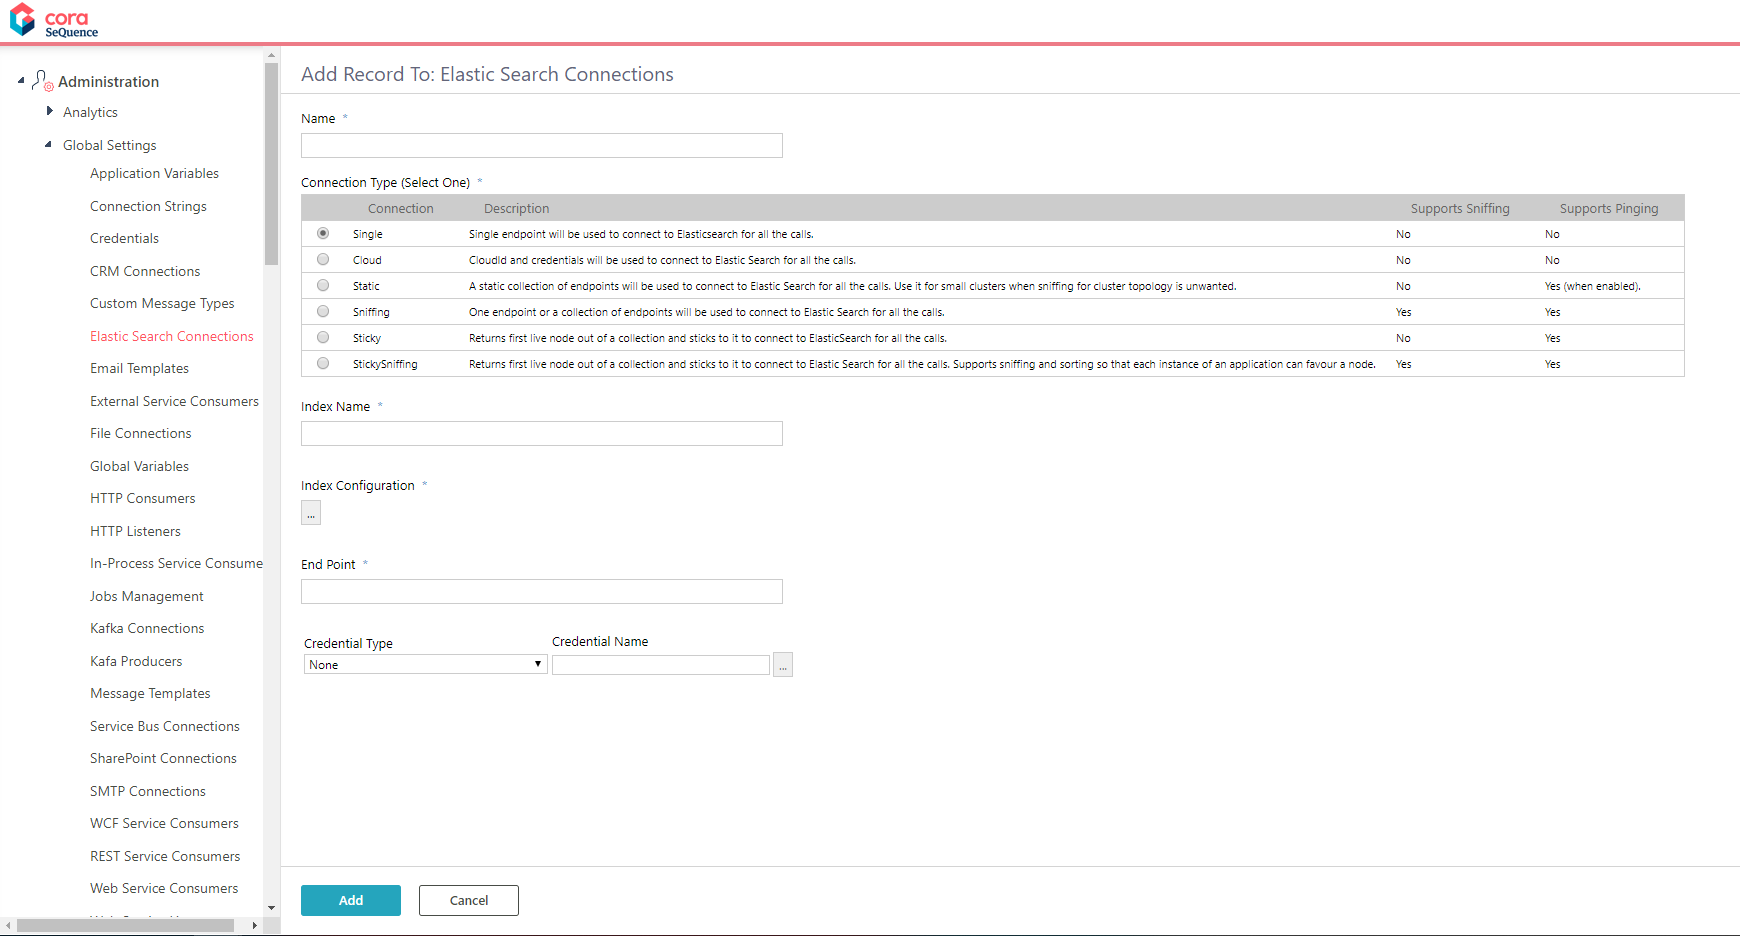
- Enter a meaningful name for the connection string.
This is the name to configure the solution's search provider. - Select the connection type.
- Enter a meaningful name under Index Name.
This is the name that you will use to view log data and analytics about the solution's index in Kibana. - Click the ellipsis button to open the Index Configuration screen.
- In the Index Configuration screen, paste the JSON that you created for the specific Hot Operations solution.
- Under End Point, enter the connection to the Elasticsearch cluster.
- If your connection requires credentials, select the credential type and enter a credential name.
- Click Add.

Set up the indexing jobs
Data indexing is performed by a JES job. You need to set up two jobs:
- Full load: Creates the Elasticsearch index based on the JSON definitions. This job copies the relevant data from the Cora SeQuence database to the Elasticsearch database.
NOTE
Depending on the size of your database, this job can take some time. To avoid performance issues, configure it to run during the weekend or during low-peak hours.
- Incremental load: This job starts to run right after the full load job completes. This job makes sure that any changes to the Cora SeQuence database are synced to the Elasticsearch database.

Prerequisites
Before you create the indexing jobs, make sure that:
- Change tracking was enabled in the database.
- The Elasticsearch connection has been setup.
Configure the full load indexing job
- Go to Administration > Global Settings > Jobs Management, and click Add Job.
- Select ElasticSearch Full Load Data Collector, and then click Next.
- On the job definition screen, define the following:
- Name: Enter a meaningful name for the full load job.
- Job Host: the list includes the servers on which JES (Job Execution Service) is installed.
Do one of the following:- Select a server on which to run the job.
- Leave the field blank, if you want the system to allocate a server to run the job.
- Job is enabled: Select this option only after you complete the workflow, or if you want to run the job for testing purposes.
- Job supports redundancy: option is selected by default. Clear the checkbox if you do not want to enable redundancy.
For more details on job redundancy settings, see this article.
- Click Next.
- On the Command tab, set the following:
- Connection to ElasticSearch (mandatory): Select the relevant connection string.
- Batch Size (mandatory): You can enter up to 10000.
Batch Size is the number of records that are synced at one time. Depending on the complexity of the cases, you may consider to set a smaller batch size.
- Click Next.
- On the Advanced Options tab, set the following options:
- Set the job to execute every 2 minutes.
- Select the "If a job is currently running, do not start the next job..." checkbox.
- If not defined, job will run with default options.
- Click Finish.
Configure the incremental indexing job
Configuring the incremental job is similar to configuring the full load job.
- Job Type: ElasticSearch Incremental Load Data Collector
- Batch Size (mandatory): You can enter up to 10000.
Batch Size is the number of changes introduced to the database.
For the detailed procedure, see the Configure the full load indexing job section above.
Enable search in Flowtime
You need to enable search to display the Case Search menu item in Flowtime. 
When enabled, the menu item displays only if at least one solution is mapped to a search provider.
You run a PowerShell function to enable or disable case search. You can use this function to set the total number of retrieved records for each search query.
Procedure
- Run the Set-CoraSeQuenceQuickSearchConfiguration function on every server that hosts the Flowtime application.
- To define the total number of retrieved records, set the
PageSizeparameter.
Select a search provider
Map the Hot Operations solution to the relevant Elasticsearch index. Only after this mapping, Flowtime users can search for cases within the solution.
Prerequisites
Before you create the connection string, make sure that:
- Search has been enabled in Flowtime.
- The indexing jobs have been activated.
Procedure
- Go to Administration > Solutions, and then select the relevant solution.
- On the solution's page, under HotOperations Common Tasks, click Choose Search Provider.
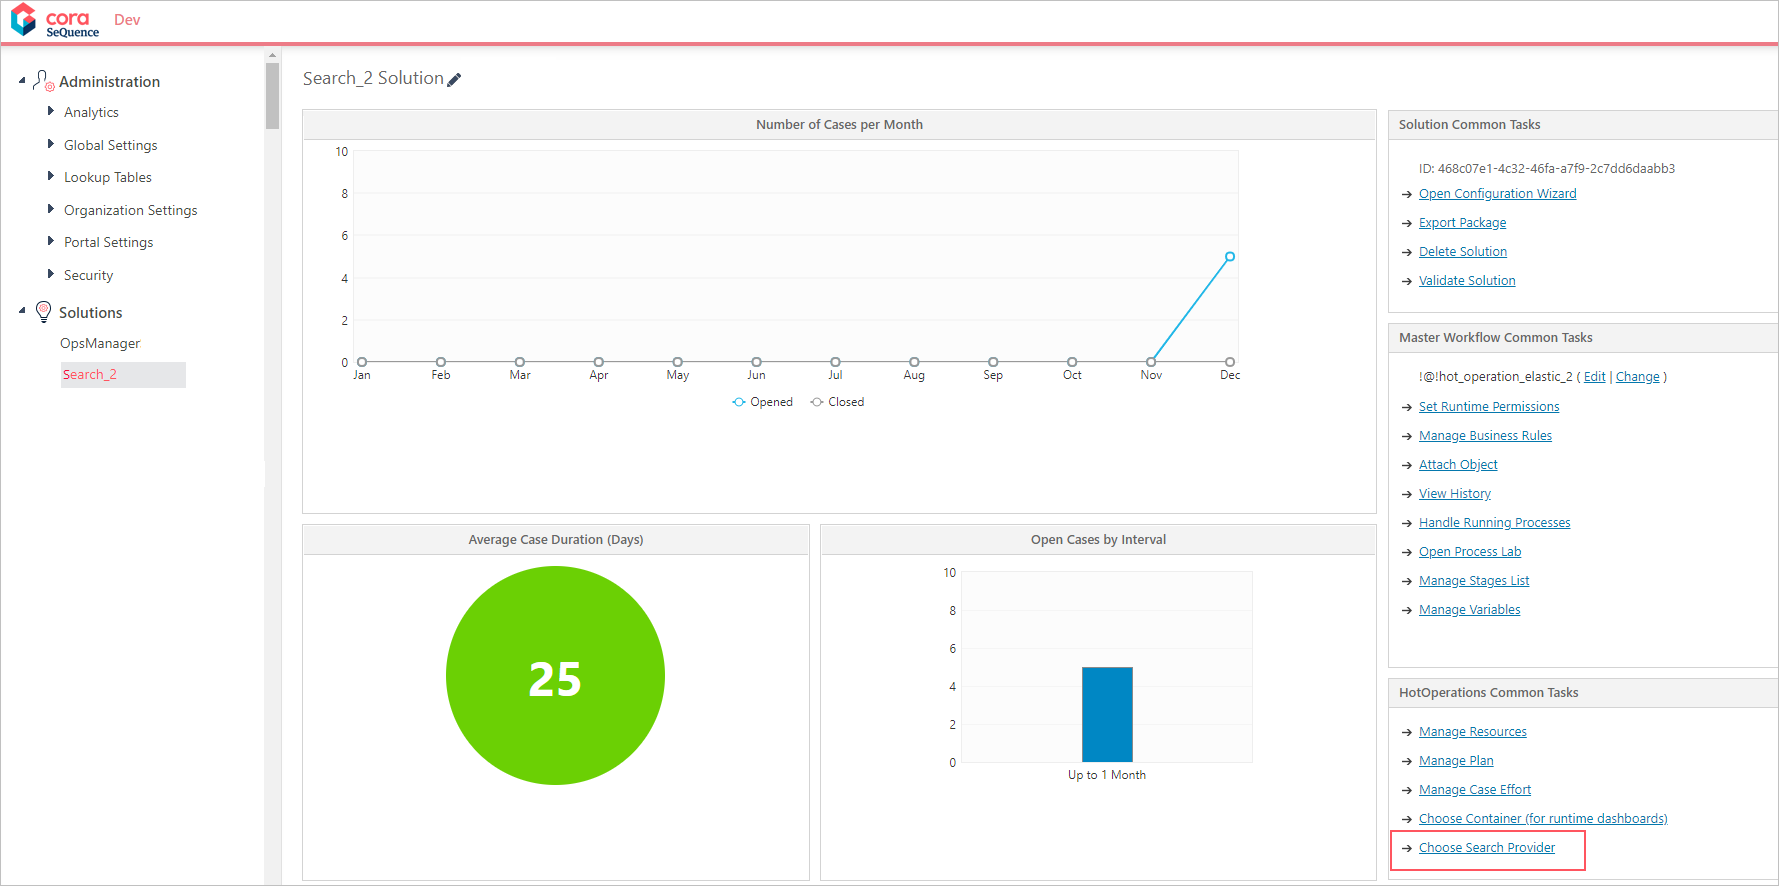
- Select the Elasticsearch connection string associated with the solution's index.
- Click OK.

