V10.3.1 and later
The Cora Orchestration portal is built on the latest cutting edge React technology, which enables new functionality and easy customization.
The UI is simple, and organized with the single-page application approach. You get a unified case management working area, which is accessible in one place, based on your role(s).
For operations purposes, you can sign in to the portal as an Operations Manager, a Team Leader, or a Team Member. Each role has access to different data and information.
NOTE
Runtime forms, Analytics dashboards (based on FusionCharts), and portal grids (based on Kendo UI for jQuery) remain in their previous technology.
 | Watch the following demos to learn more: |
When you sign in to the portal for the first time, you land on the All Cases page with Cases I started sub menu.
All Cases
Based on your role, the All Cases menu displays a list of the cases you have started and the cases you have view permissions for.

For a solution other than Cora Orchestration, you land on the My Work page with Cases Assigned To Me sub menu when you sign in to the portal for the first time.
My Work
Based on your role, you can view and handle cases and tasks in the portal. The case and task details displayed depend on your permissions.
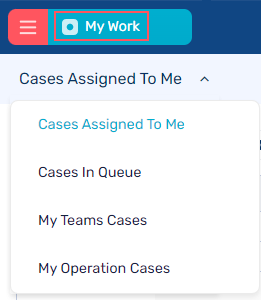
The My Work menu displays cases and tasks based on the selected solution and your role.
For systems that include HotOperations, you can have the following options, based on your role(s):
| Role | Menu option | Description |
|---|---|---|
| Team member | Cases Assigned to Me | Cases fetched by or assigned to team member. |
| Cases In Queue | Cases assigned to the team member's role in the team. | |
| Team Leader | My Teams Cases | Cases assigned to the team leader's team(s). |
| Operations Manager | My Operation Cases | Cases allocated to the Operations Manager's operation. |
General functionality
Besides All Cases, the menu includes the following out-of-the-box options: Analytics and Archive. Depending on your role there may appear other options in the menu list.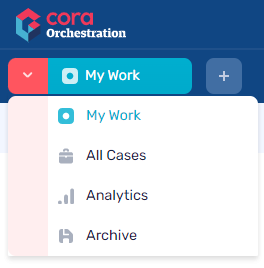
Among other things, you can select solutions, access your tasks, and search for cases or tasks in the portal.
Select a solution
Cora Orchestration is the first preselected solution for every user on signing in for the first time. It provides basic orchestration functionality. If your system includes other solutions, a list of the solutions is available for your display, based on your role and permissions. The selection is saved in the user's last portal state.

Create a case
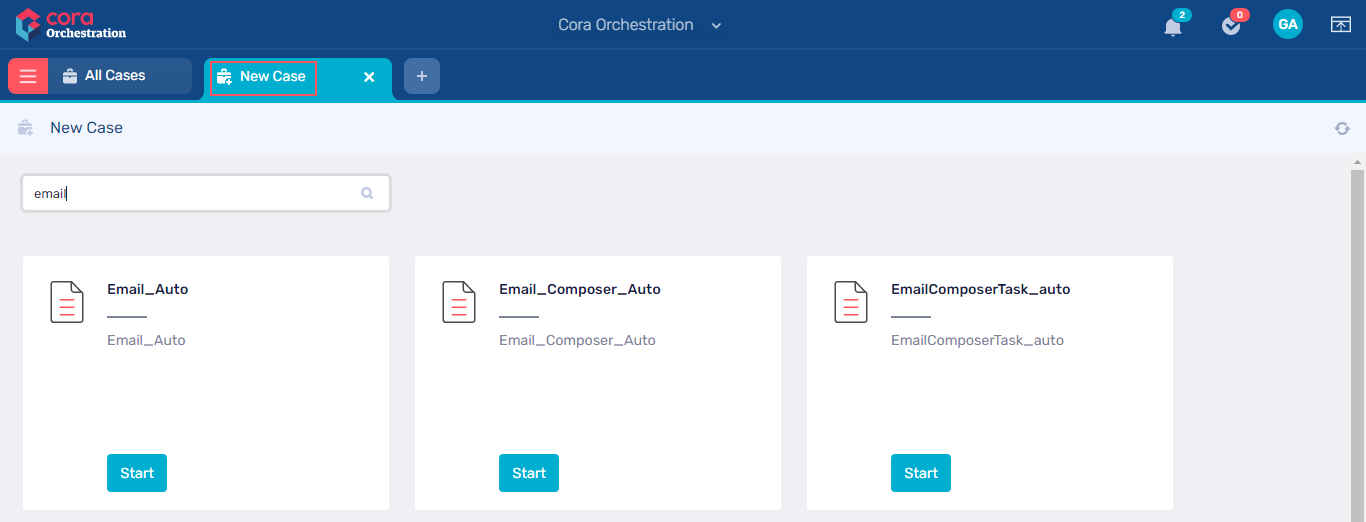
You can create cases from the All Cases/My Work page.
To create a new case:
- Click the + button.
A list of the cases to which you have permission to create appears. - Select the case for which you want to create an instance.
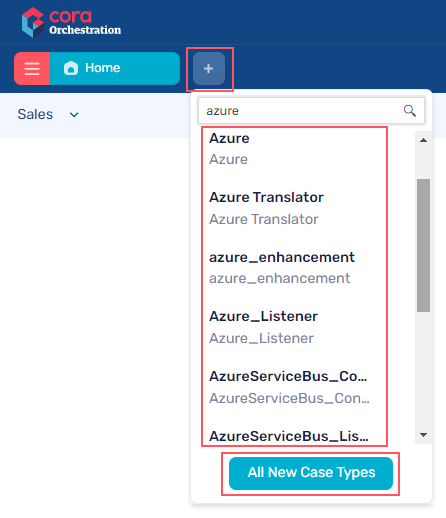

A new case opens in a new tab next to the All Cases/My Work tab.
The All New Case Types option at the bottom of the case list opens a new tab that displays all the type of cases for which you have permission to create.
Any new case created from All New Case Types is assigned to a user, and is visible to the user in the My Tasks list.
Search cases
You can configure the search functionality, and enable or disable it per requirement. When search is configured, the Search icon displays at the top-right side of the screen.

View notifications
The bell icon at the top-right side of the screen displays all your case-related and task-related notifications. The notifications count is auto refreshed for new notifications, if any.

My Tasks
The check mark icon next to Notifications is the My Tasks icon. You can click the icon to view a list of all the tasks assigned to you. The My Tasks count is auto refreshed when a new task is created and assigned to a user.

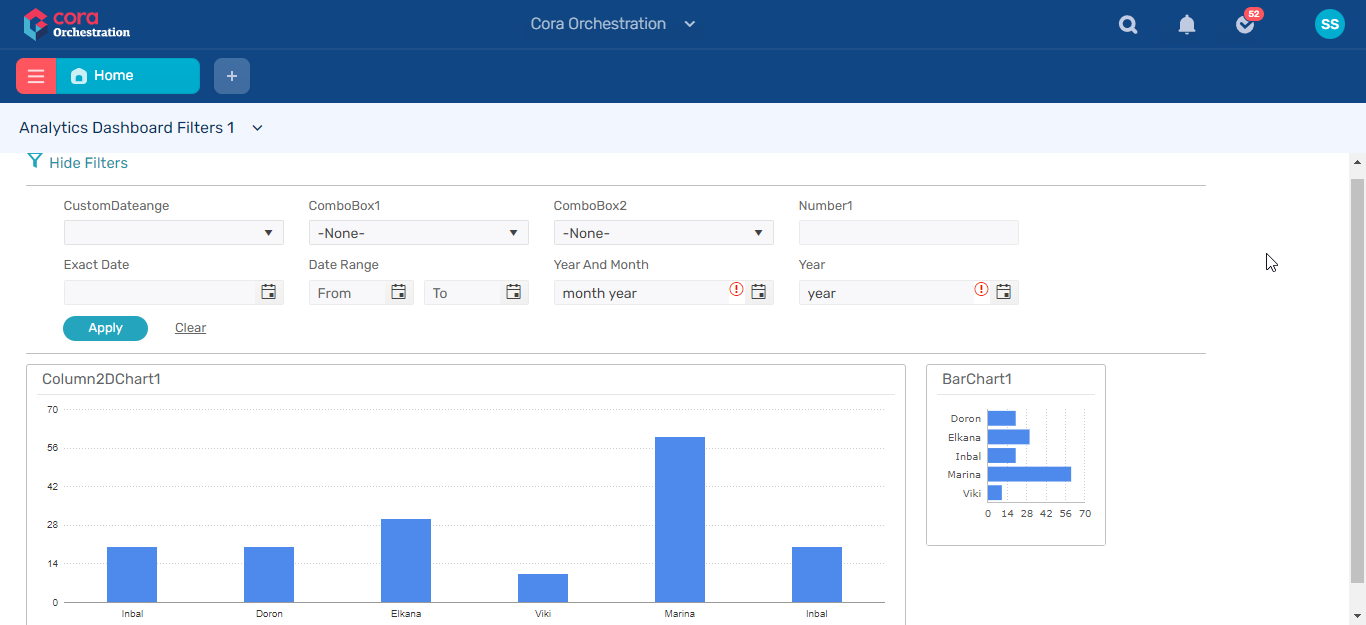
Analytics
The analytics page displays the out-of-the-box analytics dashboards, which are displayed per your role(s) and permissions.
For an optimal portal experience, we recommend that each user has permissions for at least one analytics dashboard.
For more details on creating and managing analytics, see this article.
Grid filtering
You can filter all the grids in the portal and track the changes that happened to the data after applying filters.
The grid filters are configurable.
For details, see this article.
Portal customizations
You can customize the portal as per your customer needs. Customization settings include:
- Set a color theme for the portal
- Replace logo
- Create and modify menu items
You apply your customization using a prebuilt template that provides the base code.
For details, see this article.
Contact Us and Privacy Policy
You can enable the Contact Us and Privacy Policy links. When these links are enabled, they display under Logout in the user name menu at the top-right side of the screen.
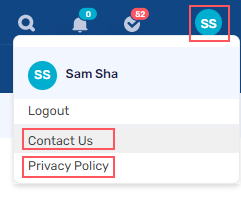
You configure and enable the Contact Us and Privacy Policy links in the Administration site.
For configuration details, see the Configure Contact Us and Privacy Policy section in this article.
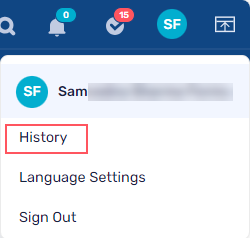
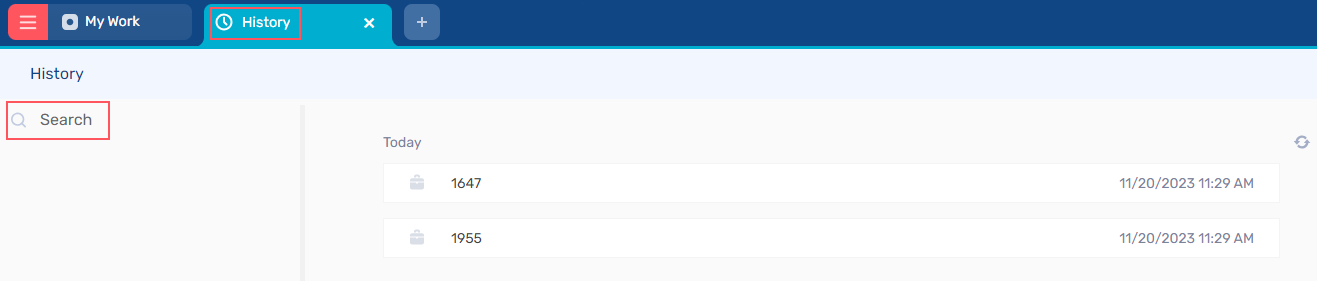
Portal history (V10.5 onwards)
You can view the portal history by clicking the History menu in the avatar menu at the top-right side of the screen.
The history tab displays the list of pages you have visited in the portal like cases you have worked on recently or analytics you have accessed, and provides you an easy access to these pages without having to navigate to them manually. You can click an item from the list to open the page in a new tab. You can also search for a particular case or analytic using the search option in the History tab.
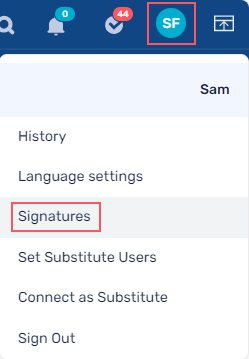
Signatures (V10.5 onwards)
As an end user you can add your personalized signatures for email communications, and view a list of all the signatures you have previously added to your profile. You can use these signatures on the compose email window while sending an email from a case.
Create a new signature
- On the avatar menu, click Signatures.
- In the Signatures window, click + Add Signature.
- In the Add Signature window, add the Signature Name and content.
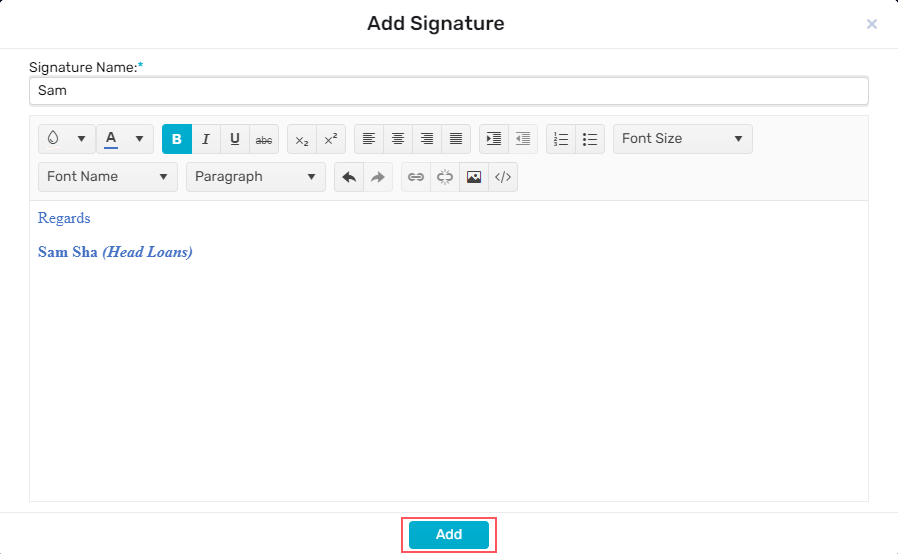
NOTE
You can embed an image in the signature text by simple copy-paste. - Click Add.


In the Signatures window, choose from the Signature list, the default signature to be set. The chosen signature appears by default on the compose email window while you send an email from a case.
In the list, you can click > for a signature to preview the signature. You can also edit or delete a signature from the list.
Generic solution signatures are not included in the portal signatures, so you can set a default signature to a generic solution.
V10.1-V10.3
The Cora Orchestration portal is built on the latest cutting edge React technology, which enables new functionality and easy customization.
The UI is simple, and organized with the single-page application approach. You get a unified case management working area, which is accessible in one place, based on your role(s).
For operations purposes, you can sign in to the portal as an Operations Manager, a Team Leader, or a Team Member. Each role has access to different data and information.
NOTE
Runtime forms, Analytics dashboards (based on FusionCharts), and portal grids (based on Kendo UI for jQuery) remain in their previous technology.
| Watch the following demos to learn more: |
Home
When you sign in to the portal for the first time, the Home page is the first page you land on. On the Home page you can view the out-of-the-box analytics dashboards, which are displayed per your role(s) and permissions.
For an optimal portal experience, we recommend that each user has permissions for at least one analytics dashboard.
For more details on creating and managing analytics, see this article.
From anywhere in the portal, you can click the collapsible menu icon and click Home to return to the Home page.
 Besides Home, the menu includes the following out-of-the-box options: Work and All Cases. Depending on your role there may appear other options in the menu list.
General functionality
Among other things, from the Home page, you can select solutions, access your tasks, and search for cases or tasks.
Select a solution
Cora Orchestration is the first preselected solution for every user on signing in for the first time. It provides basic orchestration functionality. If your system includes other solutions, a list of the solutions is available for your display, based on your role and permissions. The selection is saved in the user's last portal state.
Create a case
You can create cases from the Home page.
To create a new case:
- Click the + button.
A list of the cases to which you have permission to create appears. - Select the case for which you want to create an instance.
A new case opens in a new tab next to the Home tab.
The All New Case Types option at the bottom of the case list opens a new tab that displays all the type of cases for which you have permission to create.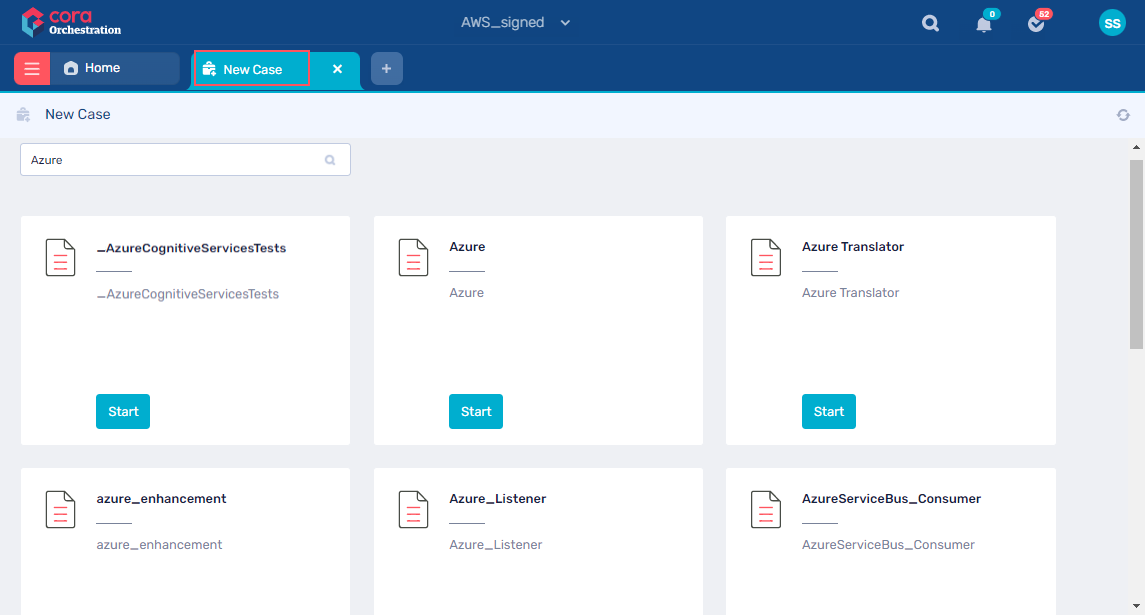
Any new case created from All New Case Types is assigned to a user, and is visible to the user in the My Tasks list under the Work menu.
Search cases
You can configure the search functionality, and enable or disable it per requirement. When search is configured, the Search icon displays at the top-right side of the screen.

View notifications
The bell icon at the top-right side of the screen displays all your case-related and task-related notifications.

My Tasks shortcut
The check mark icon next to Notifications is the My Tasks shortcut. You can click it to view a list of all the tasks assigned to you.

Work
Based on your role, you can view and handle cases and tasks in the portal. The case and task details displayed depend on your permissions.
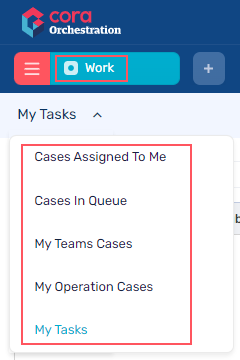
- The Work menu displays cases and tasks based on the selected solution and your role.
- For the Cora Orchestration solution, you only have the My Tasks option. My Tasks are the tasks created by you or assigned to you.
For systems that include HotOperations, you can have the following options, based on your role(s):
| Role | Menu option | Description |
|---|---|---|
| Team member | Cases Assigned to Me | Cases fetched by or assigned to team member. |
| Cases In Queue | Cases assigned to the team member's role in the team. | |
| Team Leader | My Teams Cases | Cases assigned to the team leader's team(s). |
| Operations Manager | My Operation Cases | Cases allocated to the Operations Manager's operation. |
All Cases
Based on your role, the All Cases menu displays a list of the cases you have started and the cases you have view permissions for.
Grid filtering
You can filter all the grids in the portal and track the changes that happened to the data after applying filters.
The grid filters are configurable.
For details, see this article.
Contact Us and Privacy Policy
You can enable the Contact Us and Privacy Policy links. When these links are enabled, they display under Logout in the user name menu at the top-right side of the screen.
You configure and enable the Contact Us and Privacy Policy links in the Administration site.
For configuration details, see the Configure Contact Us and Privacy Policy section in this article.
Portal customizations
You can customize the portal as per your customer needs. Customization settings include:
- Set a color theme for the portal
- Replace logo
- Create and modify menu items
You apply your customization using a prebuilt template that provides the base code.
V10.0
The Cora Orchestration portal is built on cutting edge latest React technology, which enables new functionality and easy customizations to the portal.
The UI is simple, and organized with the single-page application approach. You get a unified case management working area, which is accessible in one place, based on your role(s).
For operations purposes, you can sign in to the portal as an Operations Manager, a Team Leader, or a Team Member. Each role has access to different data and information.
NOTES
- The portal is released as a BETA version. This means that you can develop on it, but it's not yet ready for production.
- Runtime forms, Analytics dashboards (based on FusionCharts), and portal grids (based on Kendo UI for jQuery) remain in their previous technology.
Home
As you sign in to the portal, the Home page is the first page you land on. On the Home page you can view the out-of-the-box analytics dashboards, which are displayed per your role(s) and permissions.
For an optimal portal experience, we recommend that each user has permissions for at least one analytics dashboard.
For more details on creating and managing analytics, see this article.
From anywhere in the portal, you can click Home to return to the Home page.
Besides Home, the main menu includes the following options: Work and All Cases.
General functionality
Among other things, from the Home page, you can select solutions, access your tasks, and search for cases or tasks.
Select a solution
Cora Orchestration is the default solution with basic orchestration functionality for all non-HotOperation cases. Users that are part of a HotOperations solution, can choose from a list of available solutions. The selection is saved in the user's last portal state.
Create a case
You can create cases from the Home page.
To create a new case:
- Click the + button next to Home.
A list of the cases to which you have permission to create appears. - Select the case for which you want to create an instance.


A new case opens in a new tab next to the Home tab.
The All New Cases option in the case list opens a new tab that displays all the cases for which you have permission to start.
Search cases
You can configure the search functionality, and enable or disable it per requirement. When search is configured, the Search icon displays at the top-right side of the window.
To search for cases, enter an ID number.
View notifications
The bell icon at the top-right side of the screen displays all your case and task-related notifications.
My Tasks shortcut
The check mark icon next to Notifications is the My Tasks shortcut. You can click it to view a list of all the tasks assigned to you.
Work
Based on your role, you can view and handle cases and tasks in the portal. The case and task details displayed depend on your permissions.

- The Work menu displays My Tasks and the HotOperations module options based on the selected solution.
- For the Cora Orchestration solution, you only have the My Tasks option. My Tasks are the tasks created by you or assigned to you.
For systems that include HotOperations, you can have the following options, based on your role(s):
| Role | Menu option | Description |
|---|---|---|
| Team member | Cases Assigned to Me | Cases fetched by or assigned to team member. |
| My Team's Pool | Cases assigned to the team member's role in the team. | |
| Team Leader | My Team's Cases | Cases assigned to the team leader's team(s). |
| Operations Manager | My Operation Cases | Cases allocated to the Operations Manager's operation. |
All Cases
Based on your role, the All Cases menu displays a list of the cases you have started and the cases you have view permissions for.
Grid filtering
You can filter all the grids in the portal and track the changes that happened to the data after applying filters.
The grid filters are configurable. For details, see this article.
What's coming in the next phase?
- Multilanguage
- Delegations
- Manage Sharing
- Portal customizations
- Contact Us and Privacy Policy
