Overview
After you install Cora SeQuence, you can configure the Active Directory Synchronization Service to import users from your Active Directories into Cora SeQuence. The Active Directory Synchronization Service will only pull information from your Active Directory and will never write to it. The configuration consists of two main procedures, each of which has numerous sub-steps.
- Complete the Active Directory Wizard
- Configure ADSS
NOTE
Every user object in your Active Directory that needs to be synchronized, must have at least a First Name and a Last Name. These are mandatory fields and Cora SeQuence will not synchronize a user if these fields are empty.
About the Active Directory Synchronization Service
Active Directory Synchronization Service (ADSS) is a Windows service that enables easier user management within Cora SeQuence. ADSS copies the structure from the Active Directory based on the filter(s) that you define. Any parent container will be placed on the top (root level), for example, Entire Organization. ADSS is an optional component that is installed by default when you install Cora SeQuence.
By default, Active Directory data is synchronized in bulk to Cora SeQuence, overwriting changes to the organization made in Cora SeQuence. This is true even if Insert/Update/Delete options have been deselected in the screen above. If you want to revert back to the synchronization behavior of previous versions, which took the above settings into account, for example, if Update is not selected, the synchronization will not overwrite records edited in Cora SeQuence, you can do so by editing the ADSS web.config file and setting this field to false (The default is true).useBulkSynchronization="false"
Multiple Domains Synchronization Considerations
Cora SeQuence supports multiple domains synchronization.
Please note the following considerations for multiple domains synchronization:
- Synchronizing a user who has the same display name on multiple domains: the user will by synchronized properly and each entry will be unique, since it will have a unique DN, meaning that a synchronized user will authenticate using his DOMAIN\username.
However, the employee picker in the App Studio which is used in different activities and modules is based on employee display name, so the same display name may appear more than once. - When synchronizing an OU structure from multiple domains, ensure the parent name of an OU from different domains is different, for example:
Domain 1
-> OU=Retailers-1 (Parent)
-> OU=Retailer 1
-> OU=Users
-> OU=Retailer 2
-> OU=Users
-> OU=Retailer 3
-> OU=Users
Domain 2
-> OU=Retailers-2 (Parent)
-> OU=Retailer 1
-> OU=Users
-> OU=Retailer 2
-> OU=Users
-> OU=Retailer 3
-> OU=Users
Prerequisites
- Verify that you have Read access to your organization's active directory.
- Administrative access to the Sequence Administration environment (i.e. global administrator).
- Knowledge of LDAP query and filter.
- Access to the Windows Services console on the server(s) where the Active Directory Synchronization Service is installed.
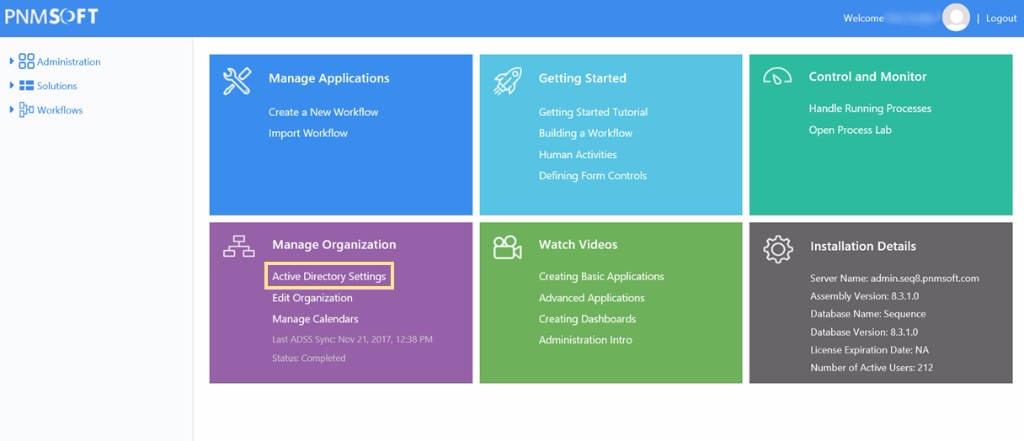
Procedure 1: Complete the Active Directory Wizard
- From the Administration site, click Active Directory Settings.
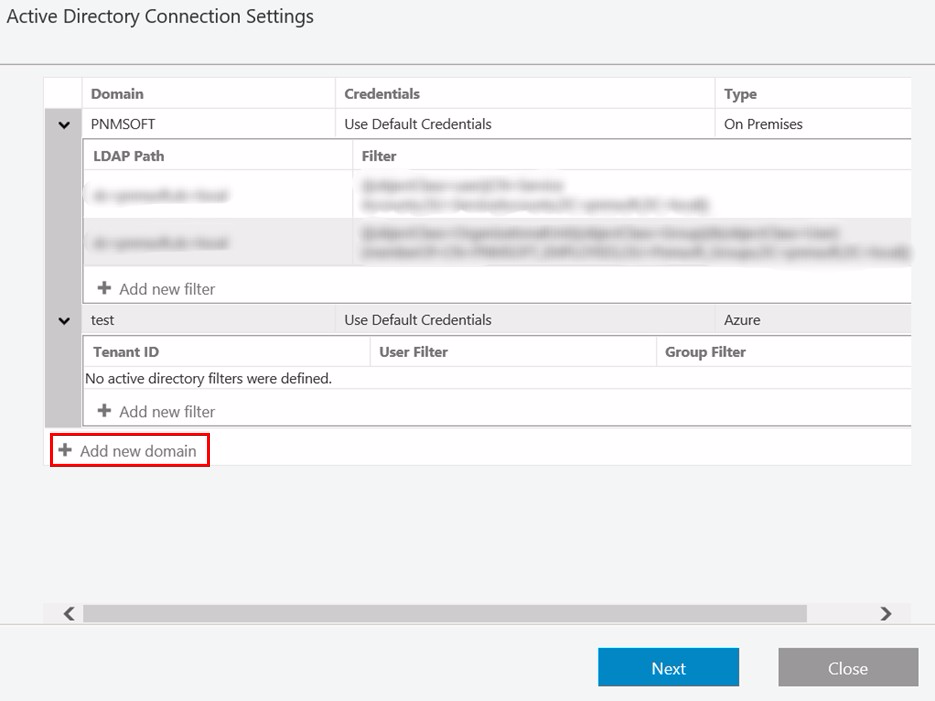
- Click Add new domain.
- Define the Active Directory Domain (On Premises or Azure), and click Save.
On Premises
The credentials are going to be used to query the Active Directory (make sure the user has permissions to do this). If Use Default Credentials is selected, then the user running the Active Directory Synchronization Service will be used. If you select the Synchronize Group Managers check box, users with the manager role in AD will be assigned the manager role in Cora SeQuence.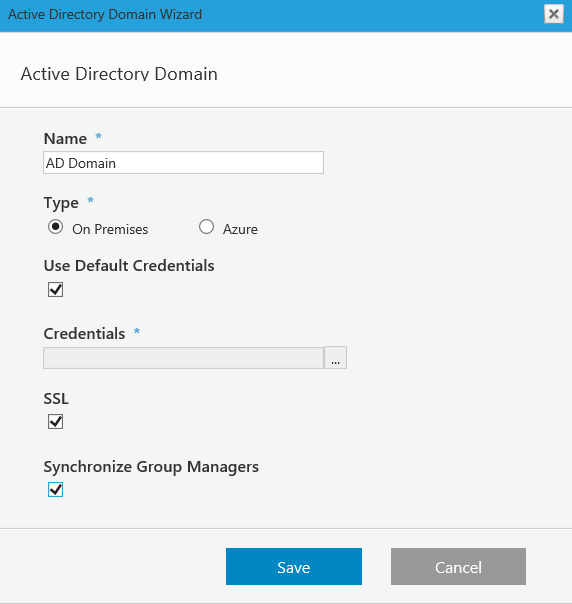 Azure
Azure
Copy the Client ID from your Azure AD portal: Azure Active Directory > App registration > Your app.
Copy the Client Secret Key from your Azure AD portal: Azure Active Directory > App registration > Your app > Keys > Set the Expiration Duration > Click Save (the certificate value displays after you click Save).
- (Optional) Define a filter for the domain, and click Next.
For more information use these links.- https://msdn.microsoft.com/en-us/library/azure/ad/graph/api/entity-and-complex-type-reference#group-entity
- https://msdn.microsoft.com/en-us/library/azure/ad/graph/api/entity-and-complex-type-reference#user-entity

Copy the Tenant ID (Directory ID) from your Azure AD portal: Azure Active Directory > Properties > Directory ID (the Directory ID is the Tenant ID).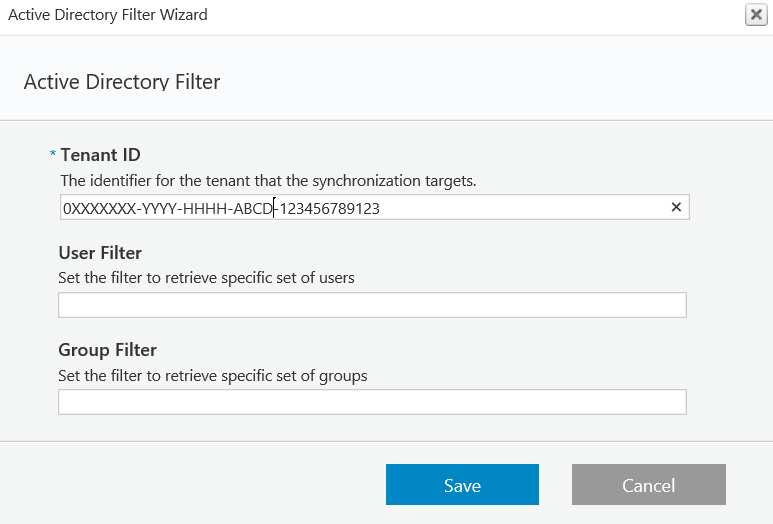
- Select the attributes (in addition to the standard ones), that you want to import from the Active Directory to Cora SeQuence, and then click Finish.
You can import user photos from the Active Directory using the photo property. Any photos that are saved in this property will be imported into Cora SeQuence. Any additional properties you choose to synchronize will be added to the employees table in the Cora SeQuence database (tblEmployees). Apart from the photo, these properties will only be available on the database table.


 Azure
Azure


Procedure 2: Configure Active Directory Synchronization Service
- Log on to the server where the Active Directory Synchronization Service is installed, and open the Services console.
- Locate the Active Directory Synchronization Service, open its Propertiespage, and click the General tab.
The service should be set to Automatic in the Startup Type field.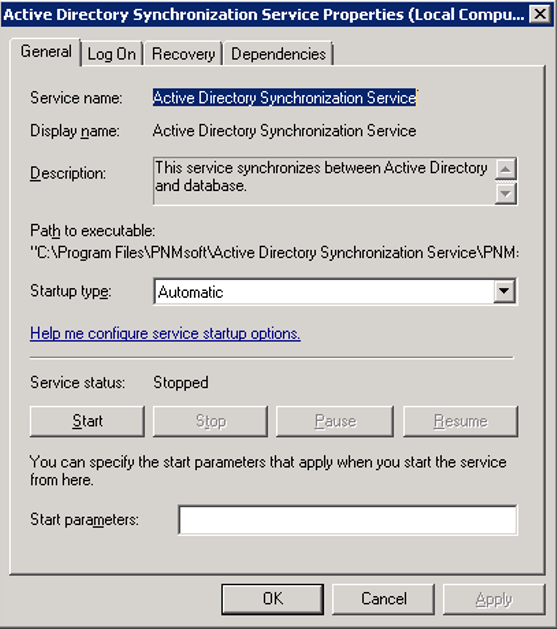
- Click the Log On tab.
The user configured in this screen is the one that was specified during the Sequence installation. This is the user who will query Active Directory for the default domain and the domains that are set to use the default credentials.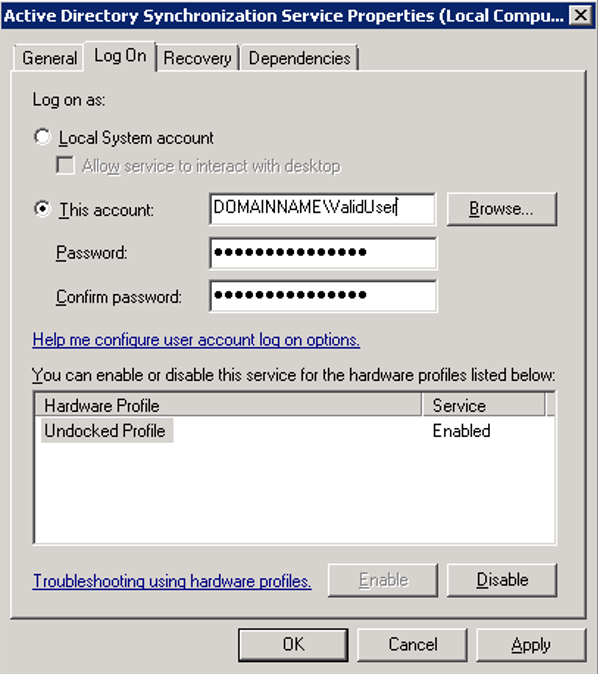


NOTE: You can install the Active Directory service on multiple machines for redundancy. The Cora SeQuence engine automatically configures failover mode and no additional actions are required.
Appendix A: Active Directory Service Config File
Open the Active Directory Service Config file.
By default, the file is located in C:\Program Files\PNMsoft\Active Directory Synchronization Service.
IMPORTANT: Any manual changes made to the configuration will be overwritten when you upgrade Cora SeQuence versions. It is important that you record any changes so you can implement them after you upgrade.
The following snippet is the only part that can be edited. An explanation of each key and its valid input follows:
<adSyncronizationThread type="PNMsoft.Sequence.WindowsServices.ADSS.BuiltinThreads.ADSyncronizator, PNMsoft.Sequence.WindowsServices.ADSS"
   interval="60"
   domain="MYDOMAIN"
   computerNameAD="MYDOMAIN"
   pageSize="100"
   serverPageTimeLimit="60"
   adUniqueKey="objectGuid"
   startSynchLoopsAt=""
   stopSynchLoopsAt=""
   useTombstonesToDetectDeletedObjects="true" />
| Key Name | Description | Valid Setting | Recommended Setting |
|---|---|---|---|
| interval | Time period in minutes that the service will pause after each update from the AD server. | Any positive integer | 720 |
| domain | Name of the domain managed by the AD server. The value is taken from the config file when the domain name of the filter is empty. | Any string (configured by the installer to what was entered in the ADSS screen) | Short name of the default domain to synchronize |
| computerNameAD | AD server name. (Obsolete from Cora SeQuence v7.4) | Any string, but must be equal to the domain. Configured by the installer to what was entered in the ADSS screen) | Must be equal to the domain. |
| pageSize | Number of records copied from the AD server each time. Should be lowered when the AD server responds slowly to avoid timeouts. | 20-500 | 100 |
| serverPageTimeLimit | Time period in seconds that the service waits for a reply before timing out. Should be raised when the AD server responds slowly. | 60-500 | 60 |
| adUniqueKey | Determines the unique key setting for the AD service. Valid settings are objectGuid to denote using the key from the AD server, or domainUserName to denote a combination of the user's domain and NT user name. | objectGuid or domainUserName | objectGuid |
| startSynchLoopsAt | Used in combination with the stopSynchLoopsAt attribute to limit the AD queries by hour of the day. | 24 hour time format: HH:mm, for example 14:35. Other formats will not be processed. | - |
| stopSynchLoopsAt | Used in combination with the stopSynchLoopsAt attribute to limit the AD queries by hour of the day. | 24 hour time format: HH:mm, for example 14:35. Other formats will not be processed. | - |
| useTombstonesToDetectDeletedOjbects | If set to true Cora SeQuence recognizes tombstones, which represent objects deleted from AD and deletes (if group or OU) or made inactive (if user). | True or False | True |
| debugState | Obsolete | On or Off | - |
Appendix B: Add Custom Code
Adding Custom Code
You can add custom code before and/or after each synchronization cycle, as follows:
- Create a new class library project.
- Ensure that your class inherits from IBeforeSynchronizationCycleStarted for code to be executed before synchronization or from IAfterSynchronizationCycleCompleted for code to be executed after synchronization.
- Implement the method OnBeforeSynchronizationCycleStarted for code to be executed before synchronization or OnAfterSynchronizationCycleCompleted for code to be executed after synchronization.
- Sign your assembly and place it on the server GAC.
- Register the assembly you have just created in the following section of the config file, according to the following sample.
<serviceEvents>
 <!-- Example how to add custom event handler assembly to the service
 <eventAssemblies>
 <add type="CustomEventAssemblyNamespace.CustomEventClass, CustomEventAssemblyName, Version=1.0.0.0, Culture=neutral, PublicKeyToken=ca08babd3815c17a" eventName="EvenetMethodName" />
 </eventAssemblies>
 -->
 </serviceEvents>
NOTE: Replace EvenetMethodName with OnBeforeSynchronizationCycleStarted or OnAfterSynchronizationCycleCompleted.
Appendix C: Basic LDAP Syntax
| Argument | Name | Description |
| = | Equal to | This LDAP argument means a certain attribute must be equal to a certain value to be true. For example, if you want to find all objects that have the first name of John, you would use: (givenName=John) This would return all objects that have the first name of John. Parentheses are included to emphasize the beginning and end of the LDAP statement. |
| & | Logical AND | Use this syntax when you have more than one condition, and you want all conditions in the series to be true. For example, if you want to find all of the people that have the first name of John and live in Dallas, you would use: (&(givenName=John)( physicalDeliveryOfficeName=Dallas)) Notice that each argument is in its own set of parentheses. The entire LDAP statement must be encompassed in a main set of parentheses. The & operator means that each argument must be true for this filter to apply to your object. |
| ! | Logical NOT | This operator is used to exclude objects that have a certain attribute. Suppose you need to find all objects except those that have the first name of John. You would use the following statement: (!givenName=John) This statement would find all objects that do not have the first name of John. Notice that the ! operator goes directly in front of the argument and inside the argument's set of parentheses. Because there is only one argument in this statement, it is surrounded with parentheses for illustration. |
| * | Wildcard | Use the wildcard operator to represent a value that could be equal to anything. One such situation might be if you wanted to find all objects that have a value for title. You would then use: (title=*) This would return all objects that have the title attribute populated with a value. Another example might be if you know an object's first name starts with Jo. Then, you could use the following to find those: (givenName=Jo*) This would apply to all objects whose first name starts with Jo. |
For more information please review the following articles:
- LDAP Query Basics - http://technet.microsoft.com/en-us/library/aa996205(v=exchg.65).aspx
- Search Filter Syntax - http://msdn.microsoft.com/en-us/library/aa746475(v=vs.85).aspx
- Active Directory: LDAP Syntax Filters - http://social.technet.microsoft.com/wiki/contents/articles/5392.active-directory-ldap-syntax-filters.aspx
