V3.0 and later
The way to manage cases can be different for different roles in Cora OpsManager.
As a Team Member, you can manage cases by resolving and closing the cases assigned to you. Go to Flowtime > Ops Manager > Task Management. You will see a Task Management submenu with the following three menu items:
- Task List
- Assignment Board
- Dashboard
Task list
On this page, you can see the list of all the cases allocated to your team(s). You can choose the team for which you want to view the task lists, from the Team list.
From the System View list, select one of the following:
- Default View - shows the list of tasks in the Open and Completed tab.
- Assigned - shows the list of tasks assigned to the members of the selected team.
- Unassigned - shows the list of tasks not assigned to any member of the selected team.
- In Progress - shows the list of tasks assigned and fetched by the members of the selected team.
NOTE
The Completed tab is not active for system views because this tab already displays a specific view of the data. You cannot apply additional filters to it.
You can save the view that best fits your needs, for future use. For more details, see the Working with Flowtime Grid Views article.
The task grid displays tasks under two tabs, based on the task status:
- Open - shows the list of open tasks for the selected team.
- Completed - shows the list of tasks already completed by the selected team. For example, if a new case comes in, and a team member performs indexing of the task, this task appears in the Completed tab and also in the Open tab, as now the team has to work on the case.
You can choose the columns you want to view in the grid. Click Columns, and select the column name check boxes you want to display.
To sort the list based on one or more columns:
- Click Sorting.
- In the Sort by panel, select the column from the list based on which the list is to be sorted.
- To add another sorting column, click + Add Column.
- Click Save.
You can add filter criteria on the grid by clicking Filters.
- Click Select Filters to display the list of columns based on which the grid can be filtered.
- Select one or more column name check boxes. The column name fields appear next to Select Filters, for you to add the filter criteria.
- Click the filter icon in the respective column name field, and add the filter value.
- Click Filter.
An envelope appears next to the case ID in the grid, either on creation of a new case or on receiving a new email for the case. The envelope icon with a red dot  depicts an unread email. The envelope turns off
  once you open the case.
You can also click the envelope icon to mark it as read or unread without opening the case. An email marked as read by one user is displayed as read for all the users.
Click the ellipsis (...) to view the context menu with these options:
- Return Task: to take the fetched case from the team member, and return it to make it available for the entire team to fetch.
- Open: to open the task for you.
- View Last Conversation: to show you the last message preview.
Starting from V3.4, this option is not available.
Select the check box against a case to display the menu with the following options:
- Reassign Task to Role: to assign the case to another role.
- Reassign Task to Employee: to assign the case to another team member.
- Reset Assignment: to return the case to all the associates in the team
- Return Tasks: to take the fetched case from the team member, and return it to make it available for the entire team to fetch.
- Close As Spam: to close the case.
- Merge Cases: to merge two or more selected cases in one.
Assignment board
On this page, you will see all the cases allocated to your team(s) and team members. From the Team list, select the team for which you wish to view the tasks. The page displays the following two tabs:
- All Tasks: Displays all the tasks for the team and the team members.
- Focused: Displays only the tasks fetched by the team members.
The Unassigned Work section displays the list of all the unassigned tasks. In the Assigned Work By Team Member section, there is one sub-section per member displaying the respective tasks assigned to the member. The Subject, Case ID, and Target Date details are displayed for each task in the list.
You can filter the tasks in the queues using the Filters option. This filter option works the same as explained above.
NOTE
The grey background of a case depicts that the task has already been fetched by a team member, and if the case background is white, the case is yet to be fetched.
You can drag and drop the white background cases from one team member to another.
Click the more options icon (three dots) to display a context menu with the following options:
- Reassign Task to Role: to assign the case to another role.
- Reassign Task to Employee: to assign the case to another team member.
- Reset Assignment: to return case to all the members in the team.
- Return task: to return the fetched case from the team member, and make it available for the entire team to fetch.
Dashboard
A dashboard helps you to keep track of the metrics and analyze case progress. It displays the data in form of tables, graphs, bar charts and line charts based on the way they have been configured. It offers real-time monitoring of data thus saving your time.
You can save the dashboard data to your system in form of reports to view later. Some of the dashboards also provide real-time data filters. All this is configured at the time of dashboard creation.
All dashboard objects are filtered by the Start Date, End Date, and Team filters except those with “Current” in their titles (which are not filtered by dates). The default date range for these is the current month.
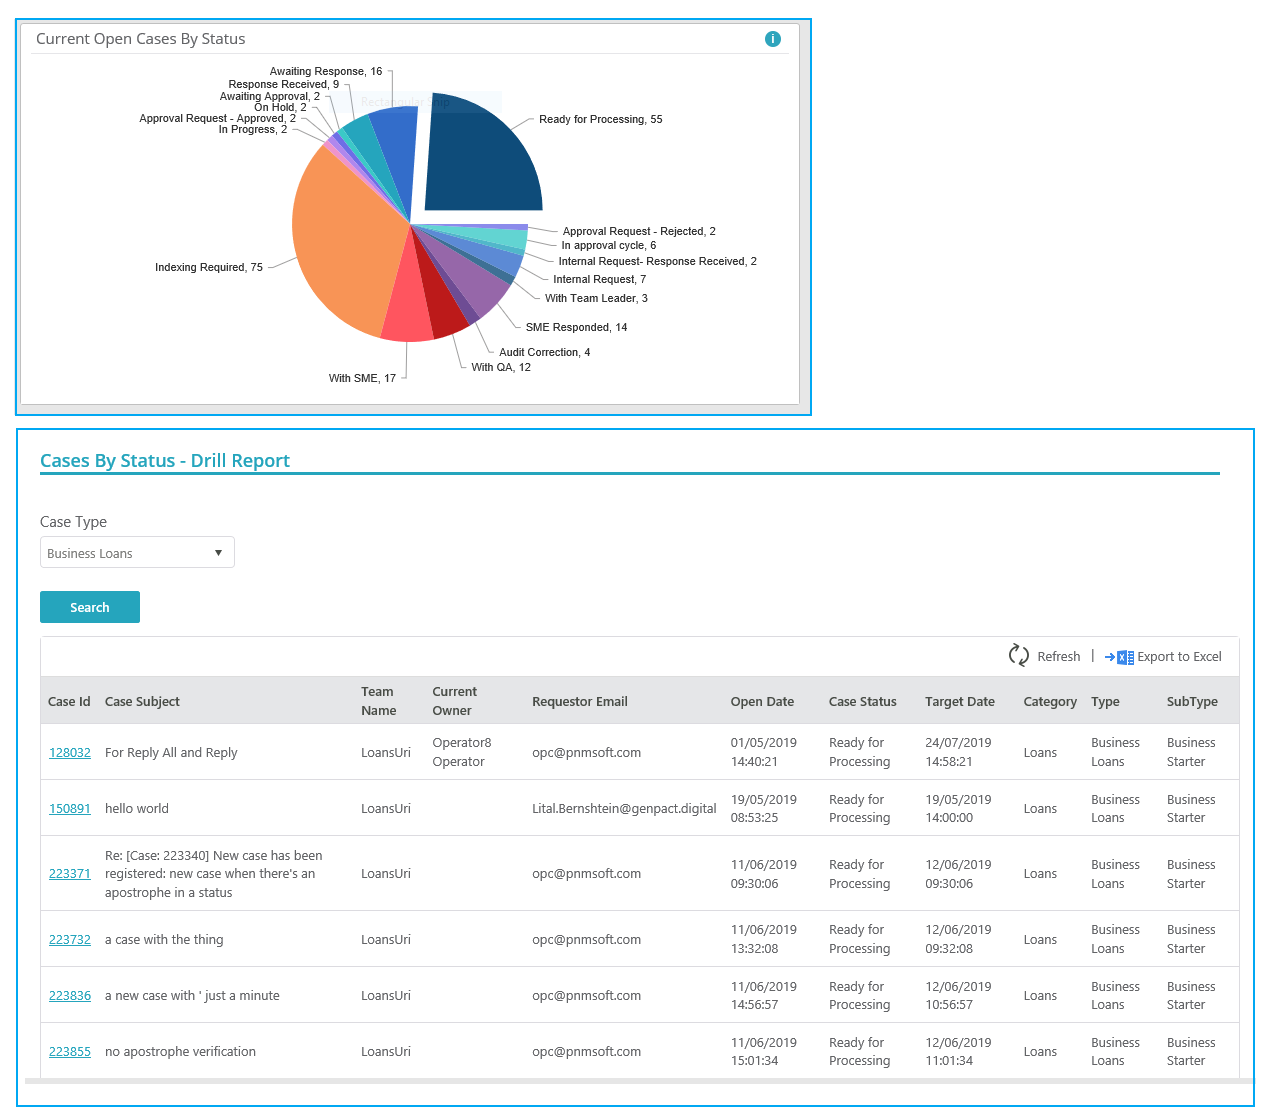 Some of the objects have a drill-down report. When you hover on the “i” icon next to the object, the tooltip info gives the description of the object and mentions if the object has a drill-down report or not.
In order to access the drill-down report, click on the relevant section, and the drill-down report will open in a new tab or window.
For the list of available out-of-the-box dashboards for Team Leader see OOTB Dashboards for Team Leader article.
Previous to V3.0
The way to manage cases can be different for different roles in Cora OpsManager.
To manage cases, go to Flowtime > Ops Manager > Ops Manager Home. The Ops Manager Home page appears with Manage Cases section asking for role selection (Operations Manager, Team Leader, or Team Member).
Manage case as Team Leader
Click Team Leader under Manage Cases section. You will land on the team Task List by default.
You may navigate to other tabs from the top menu. The available options are:
- Dashboard
- Work Assignment
Team leader dashboard
A dashboard helps you to keep track of the metrics and analyze case progress. It displays the data in form of tables, graphs, bar charts and line charts based on the way they have been configured. It offers real time monitoring of data thus saving your time.
You can save the dashboard data to your system in form of reports to view later. Some of the dashboards also provide real time data filters. All this is configured at the time of dashboard creation.
All dashboard objects are filtered by the Start Date, End
Date, and Team filters except those with “Current” in their titles (which are not
filtered by dates). The default date range for these is the current month. Some of the objects have drill down report. When you hover on
the “i” icon next to the object, the
tooltip info gives the description of the object, and mentions if the object
has a drill down report or not.
Some of the objects have drill down report. When you hover on
the “i” icon next to the object, the
tooltip info gives the description of the object, and mentions if the object
has a drill down report or not.
In order to access the drill down report, click on the relevant section, and the drill down report will open in a new tab or window.
For the list of available Out of the box dashboards for Team Leader see OOTB Dashboards for Team Leader article.
Work assignment
On this tab, you will be able to see all the cases allocated to your team. There is one section each for the team members displaying the respective cases assigned to them, and one section displaying the list of unassigned cases.
For each case, you can see the Subject, Case ID, and Target Date.
NOTE
If the case background is grey, it means that a team member has already fetched it, and if the case background is white, it means that the case has not yet been fetched.
You can drag and drop the white background cases from one team member to another.
Click the more options icon (three dots) to display context menu with the following options:
- Reassign Task to Role - to assign the case to another role.
- Reassign Task to Employee - to assign the case to another team member.
- Reset Assignment - to return case to all the associates in team
- Return task - to take the fetched case from the team member, and return it to make it available for the entire team to fetch.
Team Leader Tasks List
On this tab, you will see the list of all the cases allocated to your team(s). You can choose the team for which you want to view the task lists.
The task grid is divided into five sections, based on status:
- Open - shows the list of open tasks for the selected team.
- Assigned - shows the list of tasks assigned to a specific member of the selected team.
- Unassigned - shows the list of tasks unassigned for the selected team.
- In Progress - shows the list of tasks fetched by a specific member of the selected team.
- Completed - shows the list of tasks already completed by your selected team. For example, if a new case comes in, and a team member perform indexing of task, this task will be presented in completed tab, and also will be presented in Open tab, as now the team has to work on the case.
The filter and other options for task lists are same as explained in the Manage Cases as Team Member article.
An envelope is displayed against each case ID in the grid, on creation of a new case, and on receiving a new email for a case. The envelope icon with red dot  depicts the email as unread. The envelop turns off
  once you open the case.
You can also click the envelope icon to mark it read or unread without opening the case. The read or unread of an email is not user specific. An email if marked as read by one user will be displayed as read for all the users.
If you click on the ellipsis (...) you will see context menu with these options:
- Reassign Task to Employee - to assign the case to another team member.
- Reset Assignment - to return case to all the associates in team.
- Close As Spam - to close the case as Spam.
- Open - to open the task for you.
- View Last Conversation - to show you the last message preview.
Select the check box against a case to display the menu with the following options:
- Reassign Task to Role - to assign the case to another role.
- Reassign Task to Employee - to assign the case to another team member.
- Reset Assignment - to return case to all the associates in team
- Return Tasks - to take the fetched case from the team member, and return it to make it available for the entire team to fetch.
- Close As Spam - to close the case.
- Merge Cases - to merge two or more selected cases in one.
