V9.6
Overview
Use the Data Insert activity to insert external data from a workflow to a Cora SeQuence database table. You can then display the stored data to the end users.
This activity can also insert byte array data fetched from a web service to the database.
If the activity fails to calculate the expression for the data source, then a null value is returned. If the activity calculates expression successfully then no compensation is triggered.
Use Cases
- You can combine data from various sources to display it in a grid. Map the fields from various data sources to the fields in the Data Insert activity. The fields can then be mapped to a grid.
- You can save attachments from a form or a task in a workflow to a table in the Cora SeQuence database. Map an attachment field with its properties, content, file name, and content type, to columns in a database table.
- Use files received as a byte array in forms and tasks. Set up integration activities to receive files as a byte array from external sources.
Prerequisite
- A data source to fetch the external data from. It can be a data model, an integration activity, a form activity, or a task activity in a workflow.
- A UACT table in the database to store the fetched data.
Configure the Data Insert activity
- Open a workflow.
- In the Toolbox, go to the Data category and add the Data Insert activity.
- Connect the Data Insert activity to the other data source activities in the workflow.
- Double-click the Data Insert activity.
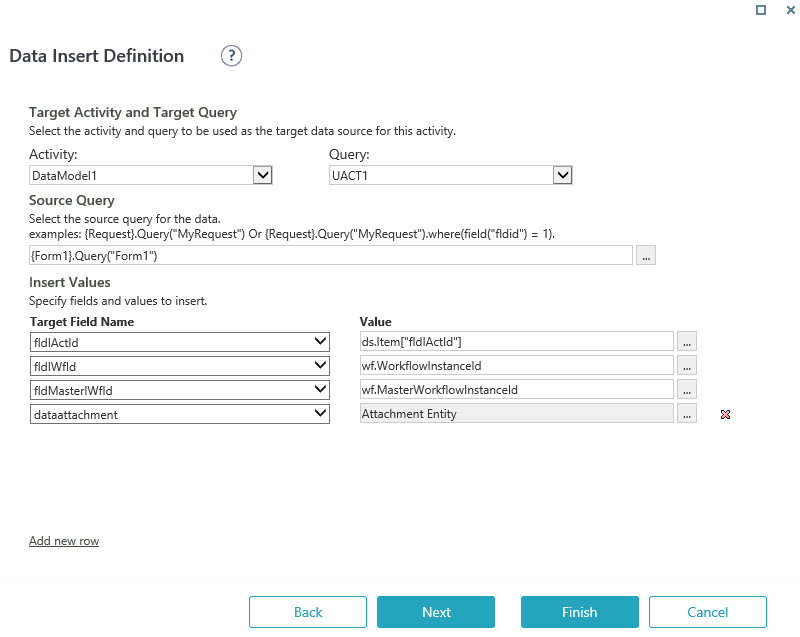
- In the Data Insert Definition screen, select the Activity and Query to be used as the target data source.
- Add the Source Query expression based on which the data is fetched.
For example, {Form1}.Query("Form1").
If you do not need a source query, then enter any number. For example, enter 1. - In the Target Field Name and Value fields map the fields and values respectively.
In the Value column, use the ds object to quickly access the fields in the source query.
For example, ds.Item["Field1"]. - Click Next.
- Under Advanced Options, select the Enable Transaction check box to execute this activity in a transaction.
- Set the transaction timeout.
Default is 180 seconds. - Set the maximum number of rows for which the activity will execute.
Default is 20. - Select the Fail on maximum rows check box to fail the activity on reaching the maximum number of rows limit.
- Click Finish.
Configure the Data Insert activity for file attachments
The Data Insert activity is configured similarly for adding external attachments to the Cora SeQuence database, except for the target fields and values.
- Follow steps 1 to 6 from the above procedure.
- In step 7, add the Text and Value target fields and values.
- Follow steps 8 to 13 from the above procedure.
Configure the Data Insert activity for byte array attachments
The Data Insert activity is configured similarly for adding external byte array attachments to the Cora SeQuence database, except for the target field and value.
- Follow steps 1 to 6 from the above procedure.
- In step 7, add the attachment type target field. In the Value field, click the ellipsis. In the Attachment Field Details screen, add the file name, its content, and file type in the Name, Content, and Content Type fields respectively.
- Follow steps 8 to 13 from the above procedure.

NOTE
You can either set the attachment type target field or the Text and Value target fields, not both.
 | Want to learn by doing? Check out this hands-on exercise. Note that only internal users can access the link. |
V8.3
Context
Use the Data Insert Activity to insert data from a dynamic workflow to either a Sequence database or external database.
If the activity fails to calculate the expression for the data source, a null value is returned. The activity does not fail, and no compensation is triggered.
Use Cases
- Combine data from various sources to display the data to users in a grid.
- Display an action that happened in the flow and track it, extending beyond the one-to-one interaction with the user.
Wizard Tips
- If you do not need a source query, then in the Data Insert Definition screen, enter any number in the Source Query text box. For example, enter 1.
- If you need a source query:
- Enter a query to use for copying the data.
- In the Value column, use the ds object to quickly access the fields in the source query. For example, ds.Item["Field1"].
- When the insert value is not taken from activity data, the system assumes the field type is the default type. For example, 35 is translated to type Int32. If you want to use a different type, for example Int16, you must use an explicit cast, such as ToInt16(35).
- To insert a GUID, use one of these expressions:
- ToGuid("xxx-xx-...")
- new GUID("xxx-xx-...")
- To insert a manual date use the expression: ToDateTime("dd-mm-yyyy")
V8.2 and earlier
Context
Use the Data Insert Activity to insert data from a dynamic workflow to either a Sequence database or external database.
Use Cases
- Combine data from various sources to display the data to users in a grid.
- Display an action that happened in the flow and track it, extending beyond the one-to-one interaction with the user.
Wizard Tips
- If you do not need a source query, then in the Data Insert Definition screen, enter any number in the Source Query text box. For example, enter 1.
- If you need a source query:
- Enter a query to use for copying the data.
- In the Value column, use the ds object to quickly access the fields in the source query. For example, ds.Item["Field1"].
- When the insert value is not taken from activity data, the system assumes the field type is the default type. For example, 35 is translated to type Int32. If you want to use a different type, for example Int16, you must use an explicit cast, such as ToInt16(35).
- To insert a GUID, use one of these expressions:
- ToGuid("xxx-xx-...")
- new GUID("xxx-xx-...")
- To insert a manual date use the expression: ToDateTime("dd-mm-yyyy")
